Wednesday, December 19, 2012


Ingredients

  • 6 hardcooked eggs (peeled cut in half and yolks mashed in a bowl)
  • 14 cup mayonnaise
  • 1 tsp Tomato taste
  • 1 Tbsp prepared horseradish
  • 1 tsp Worcestershire sauce
  • 1 Tbsp chopped celery (including leaves)
  • 12 tsp Dijon mustard
  • 12 tsp celery seed
  • 12 tsp Tabasco sauce (taste)
  •  2 tsp vodka (optional)
  • salt
  • black pepper
  • Topping:
  • 4 Tbsp Tomato Paste
  • 1 Tbsp Vodka (optional)
  • Dash of Tabasco (or more if you like it spicy)
  • chopped celery or celery leaves (garnish)

 Instructions

  1. In a mixing bowl smash the yolks, mayonnaise, tomato paste, horseradish, Worcestershire  chopped celery, mustard, celery see and, hot sauce. Transfer to a small plastic bag.  Allow the mixture to sit for 30 minutes for the flavors to meld.  Cut a small corner off and pipe the filling into the egg whites. Keep in the refrigerator.
  2. For the topping: In a small saute pan combine the tomato paste,  vodka and hot sauce and season to taste with salt and pepper.  Cook over  medium  heat until bubbly.  The consistency should be that of catsup.  If it is to  thick, use water or vodka to thin.  If it is too thin, continue to cook until it reaches the correct consistency   
  3. Cool the sauce to room temperature.  Just before serving, spoon the tomato sauce on top garnish the eggs with celery,  and serve.  
  4. The image shows the eggs topped with beef jerky...that was not to my liking. 

Tuesday, December 18, 2012

Blue Buffalo


Blue Buffalo

Ingredients                                                             

  • 1/4 cup chicken (cooked, finely chopped)
  • 1 hot sauce Buffalo wing sauce, enough to cover chicken, plus 5 teaspoons  (Franks Red Hot is my favorite)
  • 6 eggs (hard-cooked, peeled, cut in half, and yolks mashed in a bowl)
  • 1/4 cup butter (softened)
  • 3 Tablespoons Crumbled Blue Cheese (plus more to garnish)  
  • 1 tsp celery (chopped, plus more for garnish)
  • 1 salt (to taste)
  • 1 black pepper (to taste)

Preparation

  1. Place the chicken in small bowl and pour in enough Buffalo wing sauce to cover,  let sit for at least 5 minutes.
  2. Combine the thoroughly mashed yolks with the butter. Stir in the Blue Cheese and celery. Lift the chicken from the wing sauce and drain slightly, then add to the yolk mixture, along with the remaining 5 teaspoons Buffalo wing sauce. Taste, then season with salt and pepper.
  3. Fill the whites evenly with the mixture, garnish each egg half with some chopped celery and blue cheese, and allow to sit at room temperature 15 to 20 minutes before serving to let the flavors develop.

Sunday, December 16, 2012

Jalapeno Devils


  • 6 hard-cooked eggs

  • 1/4 cup sour cream

  • 2 tablespoons cooked corn kernels (fresh, canned or frozen)

  • 2 teaspoons chili powder

  • 1/2 teaspoon cumin

  • 1/2 teaspoon garlic powder  OR 1/4 teaspoon fresh minced garlic

  • 1/2 teaspoon cayenne pepper, or to taste

  • 1 teaspoon fresh cilatro

  • 2 tablespoons finely *chopped peppers* (see notes below)

  • salt and black pepper, to taste

  • Shredded Jack cheese, for 
    garnish


Cut the eggs in half and mash the yolks in a bowl. Combine the thoroughly mashed yolks with the sour cream. Stir in the corn, chili powder, cumin, garlic powder, cayenne and chiles. Taste, then season with salt and pepper.  If you are using canned corn and chilis, make sure to drain them well and pat them dry.  

Fill the whites evenly with the mixture and garnish each egg half with shredded cheese and if you like a bit of fresh cilatro or a slice of fresh pepper
*Use your favorite peppers.  For the most mild flavor use a mild canned green chili.
For a fresher flavor use a fresh green chili, jalapeno or Serrano pepper*

Saturday, December 15, 2012


The Devil Meets Greek Goddess     
                                                                             
Ingredients
  • 6 hard-cooked eggs, peeled and cut horizontally    
  • 1/4 cup Mayonnaise
  • 2Tablespoons Extra Virgin Olive Oil
  • 1/3 cup crumbled feta
  • salt and pepper to taste
  • 1/4 teaspoon. finely chopped rosemary  ~or~ 1/2 teaspoon dried
  • 12 Greek olives, pitted and finely diced
  • parsley or rosemary to garnish (optional)

Directions
Pop out (remove) the egg yolks to a small bowl and mash with a fork. In the work bowl of your food processor, combine the mashed egg yolks, mayonnaise, olive oil, feta, salt and pepper and mix thoroughly. Fill the empty egg white shells, either with a spoon or with a piping bag. Top with diced olives and parsley (if using) on top to garnish.
Cover lightly with plastic wrap and refrigerate for up to one day before serving

Image from Google Search  Recipe adapted from Deviled Egg by Debbei Moose

Friday, December 14, 2012


Dirty Martini Deviled Eggs 

Ingredients

  • 6 hard-cooked eggs
  • 3 tablespoons mayonnaise
  • 1-1/2 teaspoons minced fresh parsley
  • 1-1/2 teaspoons vodka
  • 1/2 teaspoon Vermouth (optional) 
  • 1/2 teaspoon olive juice
  • 1/8 teaspoon cayenne pepper
  • 1/4 teaspoon kosher salt
  • 1/4 teaspoon coarsely ground pepper
  • 14 Stuffed Olives.  Use Pimento, Garlic, Jalapeno or Blue Cheese

Directions

  • Finely chop eight olives and set aside. Cut eggs in half lengthwise. Remove yolks. In a small bowl, mash yolks. Add the chopped olives half the olives, mayonnaise, parsley, vodka, olive juice and cayenne; mix well. Stuff or pipe into egg whites.
  • Cut the remaining olives in half. Garnish eggs with olive halves and sprinkle with salt and pepper. Refrigerate until serving. Yield: 1 dozen.
If you garnish like the picture with a whole olive you will need 22 olives and toothpicks. 

Variation ~  For Gibson Deviled Eggs substitute the olives for cocktail onions. Just make sure to chop the onions finely. ~

Recipe from Deviled Eggs  by Debbie Moose. 

Thursday, December 13, 2012

Spinach Bacon Deviled Eggs

12 Hard Cooked Eggs, Cooled,  Peeled, Cut in Half, Yoke Removed.

1/4 Cup Cooked Bacon, Crumbled
1/2 Cup Chopped Spinach
2 1/2 T Apple Cider Vinegar
2 Tbs Softened Butter
1tsp Sugar
2 Tsp Black Pepper
1/4 tsp Salt

Cook the bacon and reserve the drippings.  Finely chop the spinach and toss in the bacon grease until wilted. When the spinach and bacon have cooled, add the remaining ingredients mix well.  Add the egg yokes and mix.  Fill egg whites with the mixture.


The original recipe calls for frozen spinach and bacon bits.  Photo and Original recipe from "Deviled Eggs" By Debbie Moose


Wednesday, December 12, 2012

Super Quick Breadsticks or Pizza Dough 

In the time it takes to brown the hamburger, add the sauce an boil the pasta, you can have fresh hot yeast bread on your dinner table! 

1 Package (2 1/4 teaspoons) of Quick Dry Yeast  
1c. Lukewarm Water
2 Tbsp Olive or Vegetable Oil
1 Tbsp Honey
2 1/2 c. Flour
1 tsp salt
1/2 tsp garlic powder. 

Mix the yeast and the water. Add all the other ingredients and kneed until smooth.  Let rest for 10 minutes.  Form into pizza crust or bread sticks.  For thin crust pizza top right away and bake.  For thick crust press into pan and let rest for 5-10 minutes, top and bake. For breadsticks form into sticks, let rest for 10 minutes and bake for 12 minutes or until lightly golden. 

You can add herbs or make it into cheesy bread or both! 


Monday, December 10, 2012


Spiced Persimmon Pear Bread

·         3/4 cup chopped pecans, divided
·         1 1/4 cups all-purpose flour
·         1 cup whole-wheat flour
·         1/2 cup packed dark brown sugar
·         1 1/2 teaspoons baking soda
·         1 teaspoon salt
·         1 teaspoon ground cinnamon
·         1/2 teaspoon ground nutmeg
·         1/8 teaspoon ground cloves
·         1 cup plain fat-free yogurt
·         1/3 cup ripe pears, finely diced 
·         1/3 cup honey
·         1/4 cup canola oil
·         2 teaspoons grated peeled fresh ginger
·         1 teaspoon vanilla extract
·         2 large eggs, lightly beaten
·         1/2 cup diced peeled persimmon
·         Cooking spray
INSTRUCTIONS
1.    Preheat oven to 375°. Place 1/2 cup pecans in a single layer on a baking sheet. Bake at 375° for 8 minutes or until pecans are fragrant and toasted. Cool. Coat two bread baking tins with vegetable spray.
2.    In a large bowl, combine flours and next 6 ingredients (through cloves) , stir well. In another bowl, combine yogurt and next 6 ingredients (through eggs), mix well using a whisk. Fold in egg mixture to flour mixture. Fold in persimmon and toasted pecans. Spoon batter into tins. Sprinkle tops with remaining 1/4 cup pecans.
3.    Bake at 375° for 18 minutes or until a wooden pick inserted in center comes out clean. Cool in pans for 5 minutes on a wire rack, and remove from pans.

Sunday, December 2, 2012

Poultry Pedicure

It is time to talk toes.  I have been a little negligent about tending to my birds toenails.  My young birds do fine and rarely need any toenail attention.  However, Best Friend is nearly 9, Tiny is nearly 8 and just like humans, chicken nails need more attention as they get older. When you chickens nails are too long it can cause a host of troubles including leg and back pain, the nail can split and crack, leading to infection and the  the worst part is that they cant scratch properly, if at all.  Long nails can begin a vicious cycle. The nail gets long and starts to curl or turn and the bird cant scratch properly and so the nail gets longer. Pretty soon you have a mess on your hands! 

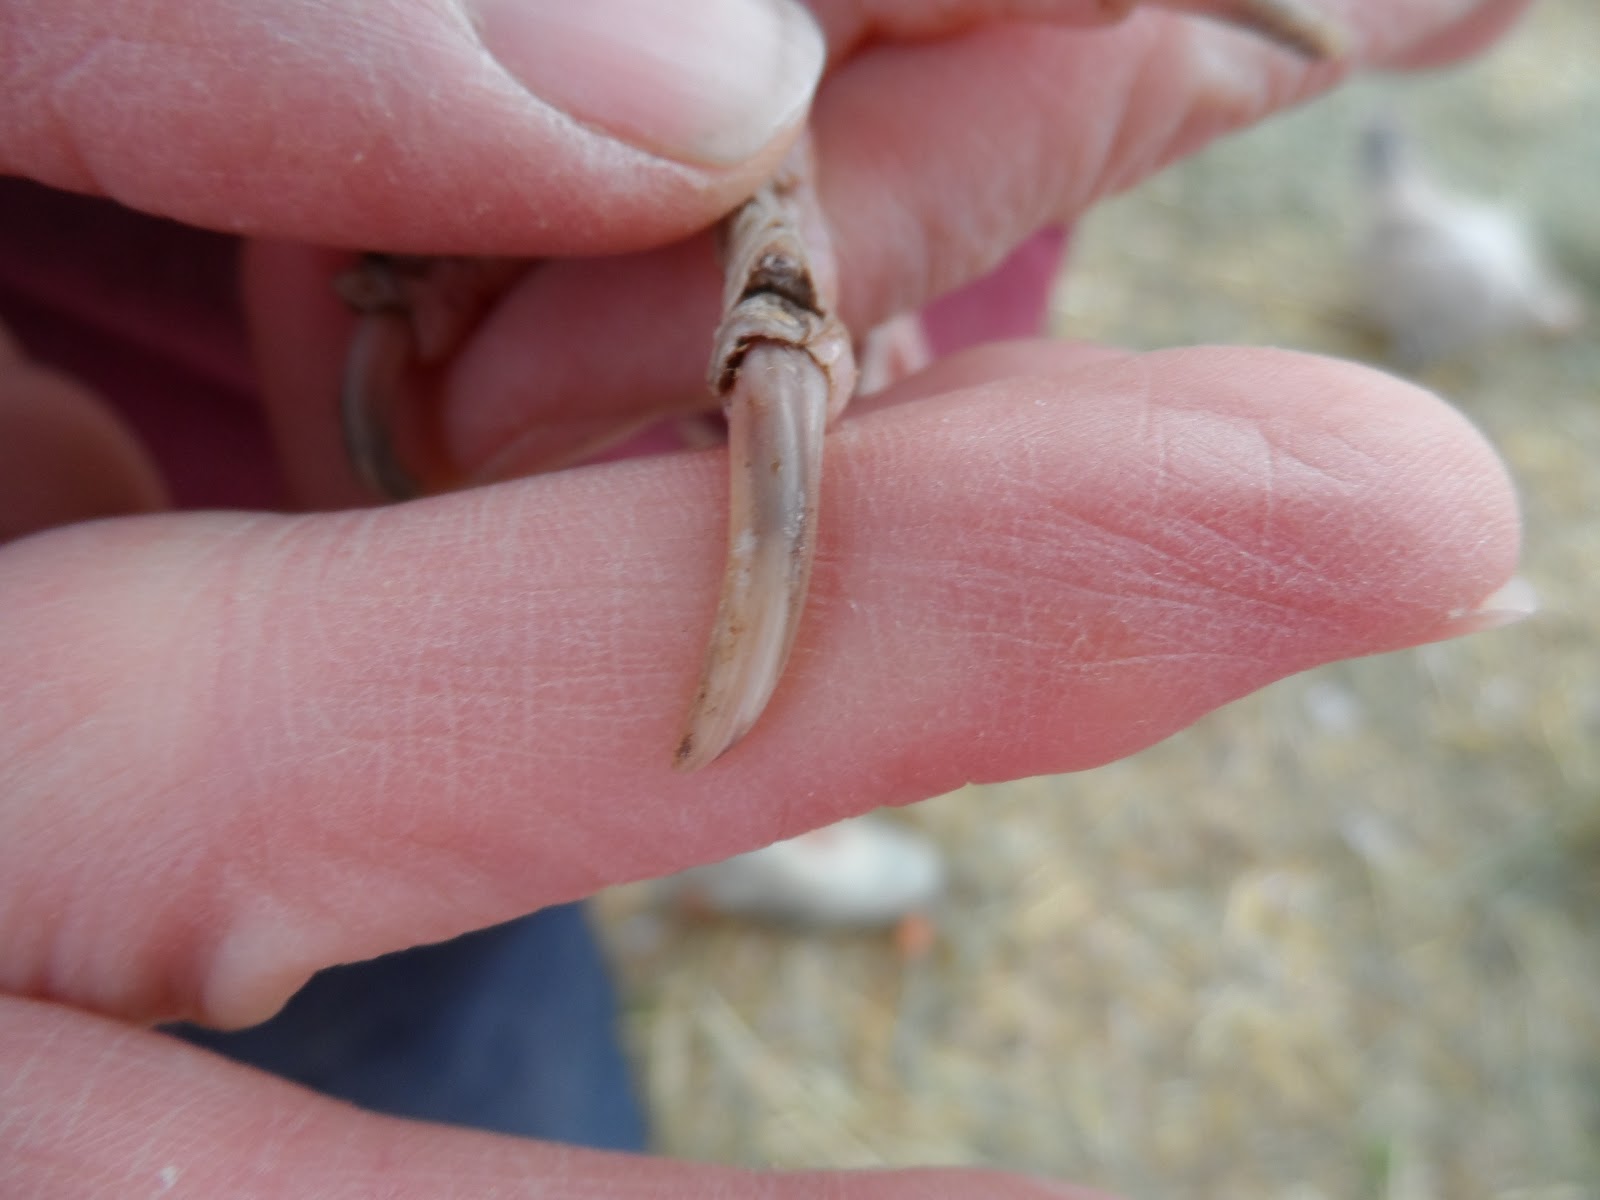
These photos are perfect examples of why you need to trim your birds nails.  This is a photo of one of Best Friends untrimmed toes.  You can see that the nail is much too long  and  it is jagged and cracking.  It is pretty easy to see the dead nail at the bottom and the darker kwik near the top.  If you look about half way down the nail you can see where the quick stops.  


This is Tiny's toenail.  While it is not in the same sorry state that Best Friends is, it is still much too long.  It is also easy to see the kwik inside the nail.

Trimming chicken nails is easy and you should not be afraid to do it.  It is just like clipping your own nails.  Don't hit the pink part and you will be fine!  

Supply List
1.   A pair of sharp clippers.  I have a pair of small animal clippers that I got from a pet shop for around $5.00  I keep them in my poultry first aid kit.  I find them easier to use than regular human nail clippers because the have the natural round shape of an animal nail.
2. A small dish of Corn Starch...just in case. 
3. Emery Board

You may want to have a helper until you get the hang of it.


 Have your assistant hold the bird like a football with her head under your arm and facing behind them, with the feet facing you. 

Once the bird is calm, look at each nail and decide which ones need trimmed.


If you look at the underside of the nail, it is pretty easy to see the kwik.  


Start trimming slowly and trim just the dead nail.  As you are trimming you will see the center start to get lighter and pinker.  Trim just to the edge of the pink.  The great thing about animal nails is that as the dead nail is kept shorter the kwik will shrink.  It takes a few trimmings to get the nail to the right length, but regular trimming will allow you to keep your birds nails in tip top condition! 


Unfortunately I let Best Friend's and Tiny's nails get too long and will take a few more trimmings to get them back into shape.  If I trim them once per week, in a month they should be just the right length. 


I don't normally have a helper when I trim, but the principles are the same.  The big girls I hold like a football and the little ones I hold front facing.  


Once you have trimmed the nail you can shape it with the emery board if you like.  If you happen to cut a little too close and it bleeds, don't panic!  Just dip the toe into the cornstarch to help stop the bleeding.  If you are careful and take your time you will be fine!  Unless you jump in and just whack the nail off at the toe, it is not likely that your chicken will bleed very much.  If you are really nervous about trimming nails,  call a local pet  groomer and ask them if you could bring the bird in and have them teach you how to do it.  


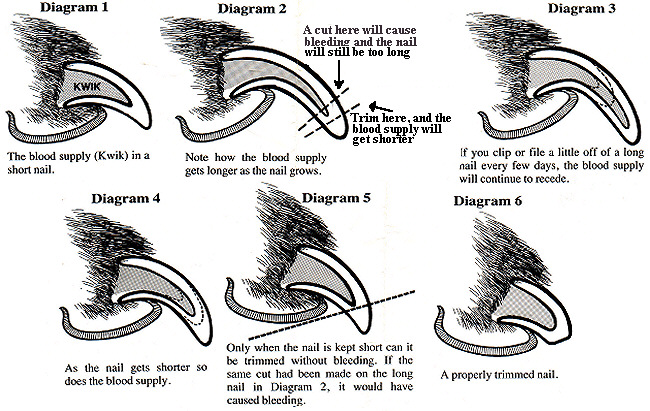
Here is a great graphic about how to trim a nail and how the kiwk and the nail work together.  This is a dogs toe but it is applicable to poultry too!  


Poultry Pedicures are easy and so important for the health of your birds!