Poultry Pedicure
It is time to talk toes. I have been a little negligent about tending to my birds toenails. My young birds do fine and rarely need any toenail attention. However, Best Friend is nearly 9, Tiny is nearly 8 and just like humans, chicken nails need more attention as they get older. When you chickens nails are too long it can cause a host of troubles including leg and back pain, the nail can split and crack, leading to infection and the the worst part is that they cant scratch properly, if at all. Long nails can begin a vicious cycle. The nail gets long and starts to curl or turn and the bird cant scratch properly and so the nail gets longer. Pretty soon you have a mess on your hands!
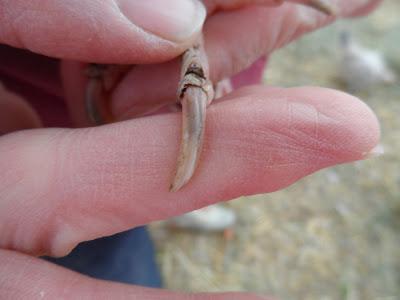
These photos are perfect examples of why you need to trim your birds nails. This is a photo of one of Best Friends untrimmed toes. You can see that the nail is much too long and it is jagged and cracking. It is pretty easy to see the dead nail at the bottom and the darker kwik near the top. If you look about half way down the nail you can see where the quick stops.
This is Tiny's toenail. While it is not in the same sorry state that Best Friends is, it is still much too long. It is also easy to see the kwik inside the nail.
Trimming chicken nails is easy and you should not be afraid to do it. It is just like clipping your own nails. Don't hit the pink part and you will be fine!
Supply List
1. A pair of sharp clippers. I have a pair of small animal clippers that I got from a pet shop for around $5.00 I keep them in my poultry first aid kit. I find them easier to use than regular human nail clippers because the have the natural round shape of an animal nail.
2. A small dish of Corn Starch...just in case.
3. Emery Board
You may want to have a helper until you get the hang of it.

Have your assistant hold the bird like a football with her head under your arm and facing behind them, with the feet facing you.
Once the bird is calm, look at each nail and decide which ones need trimmed.
If you look at the underside of the nail, it is pretty easy to see the kwik.

Start trimming slowly and trim just the dead nail. As you are trimming you will see the center start to get lighter and pinker. Trim just to the edge of the pink. The great thing about animal nails is that as the dead nail is kept shorter the kwik will shrink. It takes a few trimmings to get the nail to the right length, but regular trimming will allow you to keep your birds nails in tip top condition!
Unfortunately I let Best Friend's and Tiny's nails get too long and will take a few more trimmings to get them back into shape. If I trim them once per week, in a month they should be just the right length.
I don't normally have a helper when I trim, but the principles are the same. The big girls I hold like a football and the little ones I hold front facing.
Once you have trimmed the nail you can shape it with the emery board if you like. If you happen to cut a little too close and it bleeds, don't panic! Just dip the toe into the cornstarch to help stop the bleeding. If you are careful and take your time you will be fine! Unless you jump in and just whack the nail off at the toe, it is not likely that your chicken will bleed very much. If you are really nervous about trimming nails, call a local pet groomer and ask them if you could bring the bird in and have them teach you how to do it.
Here is a great graphic about how to trim a nail and how the kiwk and the nail work together. This is a dogs toe but it is applicable to poultry too!
Poultry Pedicures are easy and so important for the health of your birds!


I do this....but not often enough. I found this very helpful. I didn't know the part about the "quick" becoming shorter with regular trimming. Cool.
ReplyDelete