Thursday, December 13, 2012

Spinach Bacon Deviled Eggs

12 Hard Cooked Eggs, Cooled,  Peeled, Cut in Half, Yoke Removed.

1/4 Cup Cooked Bacon, Crumbled
1/2 Cup Chopped Spinach
2 1/2 T Apple Cider Vinegar
2 Tbs Softened Butter
1tsp Sugar
2 Tsp Black Pepper
1/4 tsp Salt

Cook the bacon and reserve the drippings.  Finely chop the spinach and toss in the bacon grease until wilted. When the spinach and bacon have cooled, add the remaining ingredients mix well.  Add the egg yokes and mix.  Fill egg whites with the mixture.


The original recipe calls for frozen spinach and bacon bits.  Photo and Original recipe from "Deviled Eggs" By Debbie Moose


Wednesday, December 12, 2012

Super Quick Breadsticks or Pizza Dough 

In the time it takes to brown the hamburger, add the sauce an boil the pasta, you can have fresh hot yeast bread on your dinner table! 

1 Package (2 1/4 teaspoons) of Quick Dry Yeast  
1c. Lukewarm Water
2 Tbsp Olive or Vegetable Oil
1 Tbsp Honey
2 1/2 c. Flour
1 tsp salt
1/2 tsp garlic powder. 

Mix the yeast and the water. Add all the other ingredients and kneed until smooth.  Let rest for 10 minutes.  Form into pizza crust or bread sticks.  For thin crust pizza top right away and bake.  For thick crust press into pan and let rest for 5-10 minutes, top and bake. For breadsticks form into sticks, let rest for 10 minutes and bake for 12 minutes or until lightly golden. 

You can add herbs or make it into cheesy bread or both! 


Monday, December 10, 2012


Spiced Persimmon Pear Bread

·         3/4 cup chopped pecans, divided
·         1 1/4 cups all-purpose flour
·         1 cup whole-wheat flour
·         1/2 cup packed dark brown sugar
·         1 1/2 teaspoons baking soda
·         1 teaspoon salt
·         1 teaspoon ground cinnamon
·         1/2 teaspoon ground nutmeg
·         1/8 teaspoon ground cloves
·         1 cup plain fat-free yogurt
·         1/3 cup ripe pears, finely diced 
·         1/3 cup honey
·         1/4 cup canola oil
·         2 teaspoons grated peeled fresh ginger
·         1 teaspoon vanilla extract
·         2 large eggs, lightly beaten
·         1/2 cup diced peeled persimmon
·         Cooking spray
INSTRUCTIONS
1.    Preheat oven to 375°. Place 1/2 cup pecans in a single layer on a baking sheet. Bake at 375° for 8 minutes or until pecans are fragrant and toasted. Cool. Coat two bread baking tins with vegetable spray.
2.    In a large bowl, combine flours and next 6 ingredients (through cloves) , stir well. In another bowl, combine yogurt and next 6 ingredients (through eggs), mix well using a whisk. Fold in egg mixture to flour mixture. Fold in persimmon and toasted pecans. Spoon batter into tins. Sprinkle tops with remaining 1/4 cup pecans.
3.    Bake at 375° for 18 minutes or until a wooden pick inserted in center comes out clean. Cool in pans for 5 minutes on a wire rack, and remove from pans.

Sunday, December 2, 2012

Poultry Pedicure

It is time to talk toes.  I have been a little negligent about tending to my birds toenails.  My young birds do fine and rarely need any toenail attention.  However, Best Friend is nearly 9, Tiny is nearly 8 and just like humans, chicken nails need more attention as they get older. When you chickens nails are too long it can cause a host of troubles including leg and back pain, the nail can split and crack, leading to infection and the  the worst part is that they cant scratch properly, if at all.  Long nails can begin a vicious cycle. The nail gets long and starts to curl or turn and the bird cant scratch properly and so the nail gets longer. Pretty soon you have a mess on your hands! 

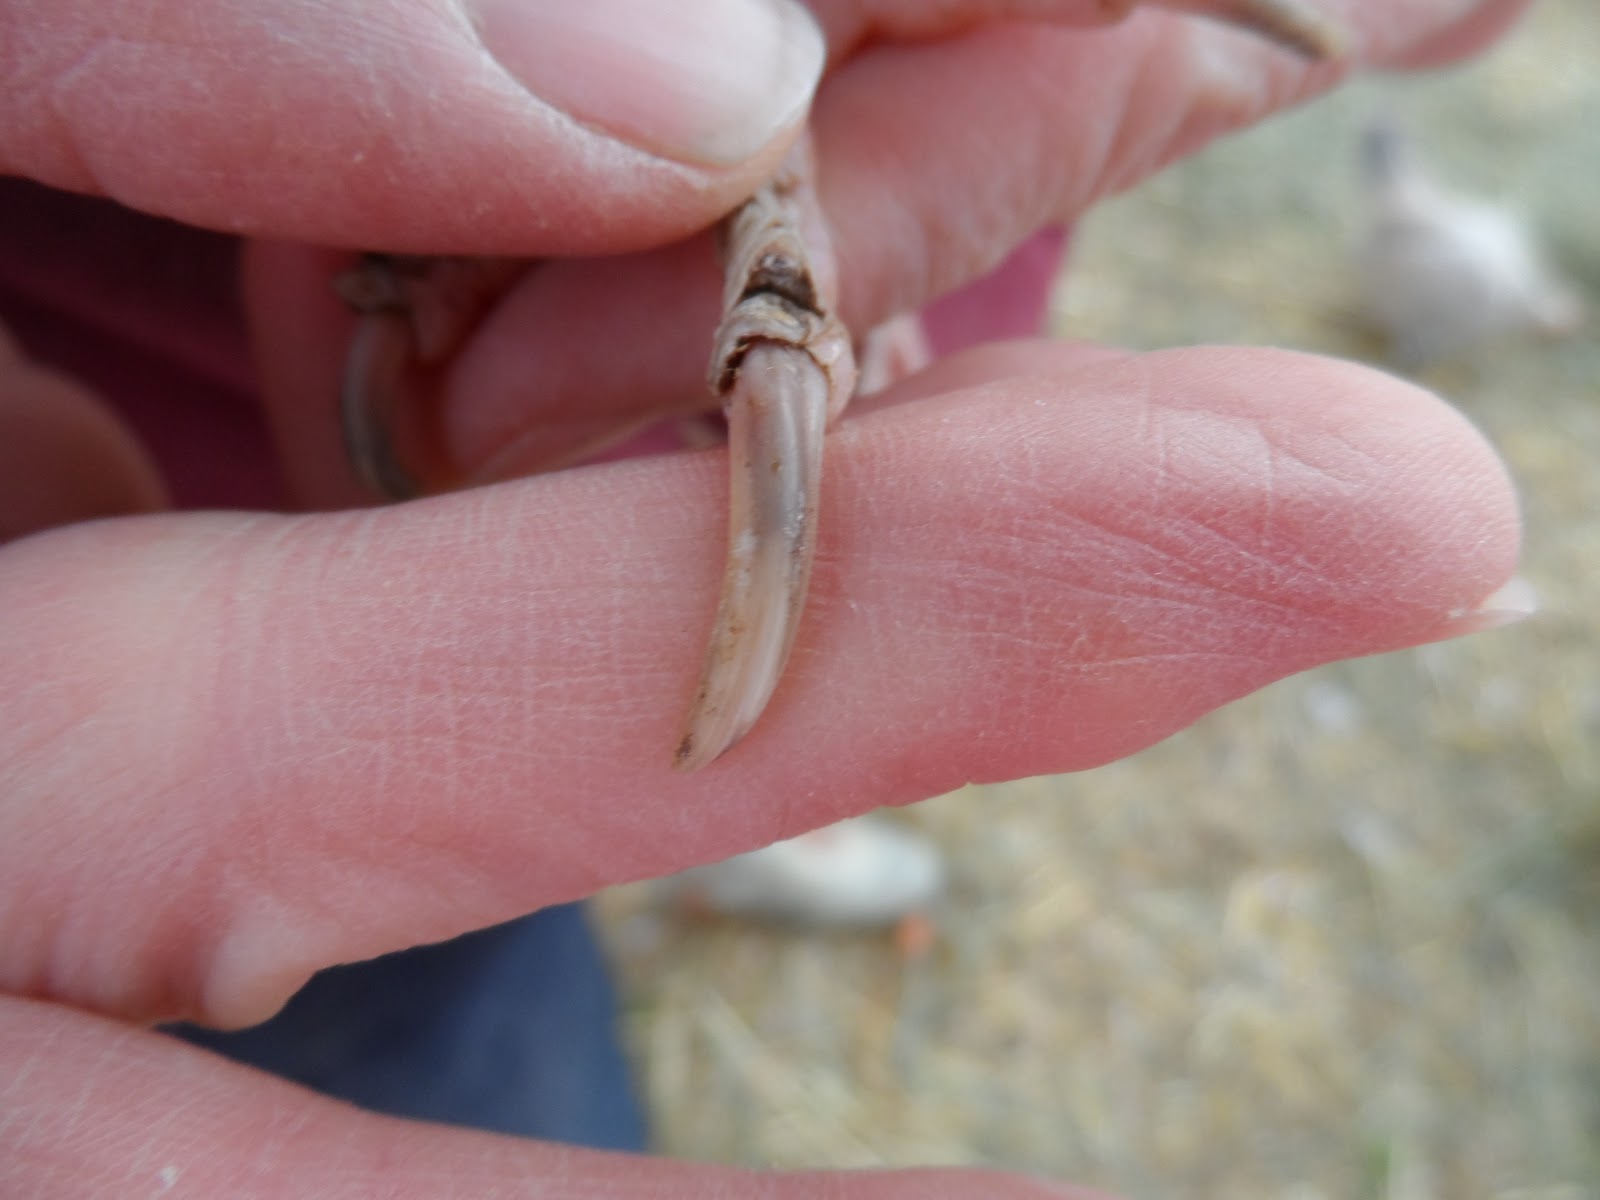
These photos are perfect examples of why you need to trim your birds nails.  This is a photo of one of Best Friends untrimmed toes.  You can see that the nail is much too long  and  it is jagged and cracking.  It is pretty easy to see the dead nail at the bottom and the darker kwik near the top.  If you look about half way down the nail you can see where the quick stops.  


This is Tiny's toenail.  While it is not in the same sorry state that Best Friends is, it is still much too long.  It is also easy to see the kwik inside the nail.

Trimming chicken nails is easy and you should not be afraid to do it.  It is just like clipping your own nails.  Don't hit the pink part and you will be fine!  

Supply List
1.   A pair of sharp clippers.  I have a pair of small animal clippers that I got from a pet shop for around $5.00  I keep them in my poultry first aid kit.  I find them easier to use than regular human nail clippers because the have the natural round shape of an animal nail.
2. A small dish of Corn Starch...just in case. 
3. Emery Board

You may want to have a helper until you get the hang of it.


 Have your assistant hold the bird like a football with her head under your arm and facing behind them, with the feet facing you. 

Once the bird is calm, look at each nail and decide which ones need trimmed.


If you look at the underside of the nail, it is pretty easy to see the kwik.  


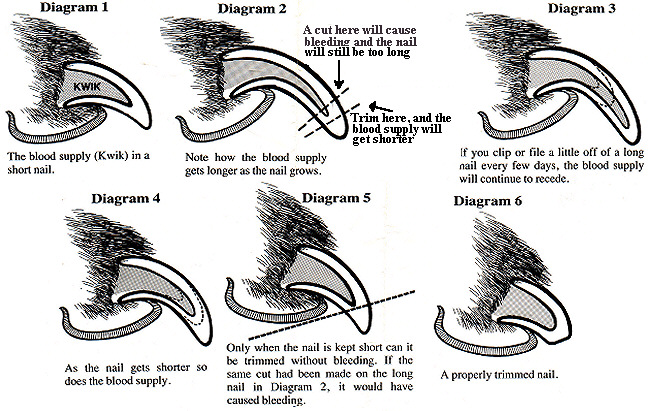
Start trimming slowly and trim just the dead nail.  As you are trimming you will see the center start to get lighter and pinker.  Trim just to the edge of the pink.  The great thing about animal nails is that as the dead nail is kept shorter the kwik will shrink.  It takes a few trimmings to get the nail to the right length, but regular trimming will allow you to keep your birds nails in tip top condition! 


Unfortunately I let Best Friend's and Tiny's nails get too long and will take a few more trimmings to get them back into shape.  If I trim them once per week, in a month they should be just the right length. 


I don't normally have a helper when I trim, but the principles are the same.  The big girls I hold like a football and the little ones I hold front facing.  


Once you have trimmed the nail you can shape it with the emery board if you like.  If you happen to cut a little too close and it bleeds, don't panic!  Just dip the toe into the cornstarch to help stop the bleeding.  If you are careful and take your time you will be fine!  Unless you jump in and just whack the nail off at the toe, it is not likely that your chicken will bleed very much.  If you are really nervous about trimming nails,  call a local pet  groomer and ask them if you could bring the bird in and have them teach you how to do it.  


Here is a great graphic about how to trim a nail and how the kiwk and the nail work together.  This is a dogs toe but it is applicable to poultry too!  


Poultry Pedicures are easy and so important for the health of your birds! 

Wednesday, November 21, 2012


I know that most of you have not even had your turkey and stuffing yet...but I wanted to share one of my favorite ways to use the Thanksgiving leftovers.   This is easy and delicious!  So plan ahead so you have enough leftovers!  Happy Thanksgiving and Enjoy! 

Stuffing Fritatta
·         2 to 3 cups leftover stuffing
·         1 cup diced leftover turkey
·         1 cup shredded cheddar
·         6 large eggs
·         2 large egg whites
·         3/4 cup milk
·         1/2 teaspoon mustard powder
·         1/4 teaspoon ground nutmeg
·         2 tablespoons grated Parmesan
·         Salt and pepper
Sour cream  or Greek yogurt to garnish


Directions
Preheat oven to 400
Coat an ovenproof nonstick skillet (cast iron is my favorite) with cooking spray or butter.
Place over medium heat (on stovetop).
Mix stuffing and turkey in a bowl, then put mixture in the bottom of pan to warm through.
Sprinkle grated cheddar cheese over top.
In a medium bowl, whisk together eggs, milk, 1 tablespoon of parsley (save the rest for later), red pepper flakes, and nutmeg. Add salt and pepper to taste… it depends on how much seasoning was used in the stuffing.
Pour egg mixture over stuffing and cheese to cover stuffing. Sprinkle Parmesan over top.
Carefully transfer to preheated oven.
Bake until the eggs are set and the sides have puffed up a little bit and cheese is golden, about 15 to 20 minutes. 
Cool before cutting.
Sprinkle with remaining fresh parsley and serve with a little sour cream or Greek yogurt  

Friday, November 16, 2012

Frozen Mini Pizzas  
School is out for then next 10 days.  So far today I have heard "I am hungry" at least a dozen times!  I am slightly behind with my real job so I was letting B fend for herself.  Breakfast was hot chocolate and cinnamon toast.  9:00 snack Crackers, 10: 00 snack Grapes, 11:00 snack Cheddar Bunnies.  And then..:what's for lunch?"  I gave her all of her normal choices.  All I got was a blank stare and  "is there any pizza?"  I decided that  it was time to take action!  I spent less than 1 hour and made 14 mini pizzas that are in the freezer,  ready for toppings and  then into the oven.


Quick Pizza Dough
1 Package Quick Rise Yeast (2 1/4 teaspoons)
1 c. warm water
1 T. Honey
2 1/2 c. flour
1/2 t. Garlic Powder
1 t. Salt
Cornmeal for dusting

Mix the yeast and water in a glass bowl. Let it rest for 5 minutes.  Add the other ingredients.  Mix well.  Let rest for 5 more minutes.  Divide the dough into desired portions and roll out.  Place on a baking sheet that is dusted with cornmeal and prick with a fork.

For thin crust roll and put immediately in a 450 degree oven for about 8  minutes or just until they start to turn golden.

For thicker crust roll our and let rest for 10 minutes then bake until just golden.


This dough is easy to work with and has a silky texture.   It makes excellent bread sticks! 


Cool the crusts on wire racks.  Once they are cool, place them back on the baking sheet and  top with your favorite pizza sauce.  At this point you can add whatever tickles your fancy. Put the baking sheets and pizzas in the freezer. Once they are solid wrap them individually in plastic wrap and put them back in the freezer.  We don't top our until we are ready to bake them.  I keep shredded cheese, olives and other toppings chopped and ready to go in the refrigerator. When someone wants lunch, they top their own pizza and place it in 350 degree oven until it is hot and bubbly!

It has been nearly 3 hours since B had her pizza, I have not gotten one "I am hungry"!  


Saturday, November 3, 2012


I spent $2.99 for 50 meal worms.  I think the container probably cost more than the value of 50 worms.  I have heard that it is really easy to raise your own, so I figure why not!
Here's How:
1.        Get a small plastic tub for a container. Inexpensive clear containers with vented snap on lids are available at pet stores.
2.       Place 1-2 inches of substrate (which mealworms will eat) in bottom. Use oat bran or unmediated poultry feed.
3.       Place 1/2 a potato or apple on substrate (supplies moisture and food).
4.      Add a small container of live mealworms from the pet store.
5.       Replace potato/apple every couple of days (do not let it get moldy).
6.      The mealworms are the larval stage; within 3 weeks they should pupate, then in another two weeks beetles should emerge.
7.       The beetles will lay eggs, which are minuscule and very difficult to see. When these hatch, the larvae are also very small.
8.      The beetles will die, while the larvae will grow and repeat the cycle.
9.      After one life cycle the colony should be well established and you can start using them for treats/food.
10.    Once feeding mealworms from the colony, you can offer a variety of vegetables and fruit (e.g. carrots, orange, greens) to increase the nutritional value of mealworms for your pet.
11.     Do not allow mold to grow on the food or substrate.
12.    Add bran/oats as necessary to maintain the substrate level. Start with fresh substrate occasionally (especially if mold or damp conditions develop).
13.    If you have too many mealworms, place the whole container in the fridge, as this will stop their development.
14.    Simply rewarm to room temperature when ready, and the colony will resume development.
Tips:
1.        Do not change the substrate until the colony is well-established, as eggs and tiny larvae will be lost and the cycle interrupted.


2.      Once you have lots of mealworms, it is fine to completely clean out the substrate - filter out the mealworms, discard the substrate, and start over.