Saturday, June 29, 2013

What's for dinner- A picture is worth 1000 words.


The background.  The 5 minute pizza dough...yes homemade yeast pizza dough without hours of rise time- can be found in my November 16, 2012 blog.  

Veggis ~ everything is out of the garden, beans, potatoes, purple beans, cauliflower, sweet pepper broccoli, but use whatever makes you smile.  The herbs I used were parsley, basil and fennel.  Season with salt, pepper and olive oil. 

Saute your veggies or wrap them in foil and put them on the grill. Cook them until they are just done, but not mushy. 

I brushed the crust with olive oil,  used some finely chopped left over skirt steak and some gorgonzola crumbles topped that with the vegetables and a light sprinkling of mozzarella to hold it all together. 

You can grill the pizza or put it in a 450 degree oven until the crust is crunchy and the cheese is melted.


Sunday, May 26, 2013

I did not create this recipe...I got it from my sister in law, who I do not think created it, but you never know.  So, to whomever created this amazing stuff...THANKS!

Thursday, February 28, 2013

Adding Chicks to Broody Hens

Have you ever been in a public place full of darling cute chubby babies?  Don't you just love them, their big eyes, rosy cheeks and toothless grins!  

When they start fussing and screaming aren't you glad they belong to someone else?  Yet when it comes to your own children they can do no wrong! 

Hens are the same way.  If they have not bonded with their eggs...adding a chick from the feed store just isn't going to happen.  The longer they sit the more willing they are to take on foster babies. 


My process for adding day old chicks to a broody hen is pretty simple.  I have tried and true hens that are good mamas. It takes time to find the right hen.  It just takes practice.  I have never had a hen not take a chick.  

1. You need to let your broody sit for at LEAST 10 days, I try and let them go to full term.  This gives them time to bond with the eggs, they become hers!  Let her sit on the same number of eggs as you plan on putting chicks under her.  

1. Once you get the chick home, no matter what time of day, put the box near the broody so that she can hear their peeping.  Remember to keep them warm.  I let mine peep for about 30 minutes.

2.  Take an egg out and put a chick under her.  See how she reacts.  Does she coo or does she peck the baby on the head?  If she coos you are good to go, if she has another reaction that is not motherly, take the chick back and try again in an hour. I try and add the chicks from the back of the hen, but that is not always possible.  

3.  If she takes the first chick you can repeat the process every 10 or 15 minutes until you have added all the chicks and removed most of the eggs.   I leave an egg or 2 until the next day, just so she thinks she is not done yet.  

If the hen does not accept the first chick after an hour of listening to the peeping, you may have to wait until night.  So have the brooder ready because your chicks with need heat and nourishment.  You still need to do a few at a time. But when it is dark and everyone is quiet, she might not know what you have done! 
I would keep it dark until morning and are able to be there and see how she is going to react. They should be fine. 

If you give you hen time to bond with her eggs and to listen to the peeping,  you should not have any trouble adding live chicks to a broody hen!  


 Roasted Pablanos Stuffed with Chicken Chorizo and Cheese 
Served with Crispy Smashed Potatoes
 and Soft Fried Egg. 


Every fall we buy a half bushel of roasted pablano peppers from a local farm market.  I keep the skin on the peppers, divide them into meal sized portions and put them in freezer bags.   I like the pablano pepper because it has thick flesh, a nice large cavity for stuffing and just the right amount of heat.

This dish can be made with any type of pre-cooked meat. This particular pepper as stuffed with chicken chorizo.  I have used left over taco hamburger, pot roast, grilled chicken, turkey. If I am using leftovers meat I chop my meat and heat it with a little oil in a skillet.  I season with a little cumin,  maybe some chili powder and garlic and if needed salt and pepper. Be creative with your filling. I have even stuffed it with Asian Stir Fry.  For vegetarian versions use rice and beans, tofu or any kind of pasta salad, couscus, quinoua.  Just make sure that you like the flavor of what you are putting in the pepper and you will love the whole dish!

If you don't have pre roasted peppers purchase some nice sized fresh peppers with thick flesh.  To prepare the raw pepper blister the pepper over an open flame or under the broiler.  Make sure to blister the skin evenly.  Put the hot pepper in a plastic bag and let it steam until they are cool.
Rinse the skin off the pepper.  Using a sharp knife slit the pepper from stem to base, just above the tip. Clean out the seeds and peel out the veins.  Work carefully and try not to tear the pepper, but if it happens, lay the biggest whole portion of the pepper on the baking dish, put the filling on and wrap the remaining portions around.   

Stuff the pepper with your pre-made filling and top with your favorite cheese.  Put the peppers in an oven proof baking dish and bake until the cheese is hot and bubbly.

To make the Crispy Smashed Potatoes
Bake your favorite potato until completely cooked.   Place the potato on a baking dish, slit the top open and smash with the bottom of a coffee cup or other flat object. The potato should be no more than a half inch tall.  Put a generous pat of butter on top of the potato season with at least salt and pepper (but you can get creative here too!)  Put the baking dish in a 350 degree oven for about 15 minutes or until the bottom is crispy. Then turn on the broiler and crisp up the top.

Just before serving fry up a soft egg.

Stack the potato, pepper and top with the egg.


Friday, February 22, 2013

Happy National Margarita Day! 


 Blackberry 
Chipotle
 Margarita


½ C Tequila
¼ C Triple Sec
¼ C Lime Juice
¼ C Agave Nectar
6-8 Large Blackberries
Chipotle Dust  (Ground Chiplote) 

This will make 4 or 5 margaritas.  
For a frozen Margarita, put everyting in the blender (except the Chipotle Dust)  Blend until smooth.  Pour into your glass and sprinkle with the Chiptle Dust.  
To enjoy your drink On the Rocks.  Muddle the berries in the bottom of the glass. Add the liquor, lime and agave.  Mix well.  Add the ice mix again.  Dust with the Chipotle. 

The origial recipe calls for fresh jalapeno and no chipotle.  If you would like to try this variation, just  a  1/4 to 1/2  finely chopped fresh jalapeno and omit the chiptole dust. 

Thursday, February 14, 2013


Chick Care

Giving your chicks a healthy start in life determines how well it will perform for you when they are grown.  Proper nutrition as a baby effects how many eggs she will lay in her life, the quality of the shell, whether the feather pattern is correct for the breed and how prone to disease they will be as adults.

Feed ~ All chicks should be fed chick starter for the first  4 weeks then put on grower feed for the next  12-16 weeks.  Chickens like to scratch.  Use a proper chick feeder to keep them from scratching their food everywhere. 

You will find chick feed comes in medicated and unmedicated.  Medicated feed is designed to combat a parasite called Coccidiosis which is contagious and can be deadly.    Medicated starter generally has amprolium which is a thiamine blocker for cocci.  As a result the cocci parasite does not reproduce as quickly and the chick and develops resistance (not immunity) to cocci.  Medicated feed does NOT contain antibiotics.   

Chicks vaccinated for Coccidiosis  SHOULD NOT have medicated feed.  

Otherwise choosing medicated or unmedicated  feed is a personal choice.  

Water  ~ CLEAN water is vital.   The chicks will scratch their bedding in it and poop in it.  Little chicks can get sick fast if they don’t have clean water.  If you wouldn’t drink it don’t let them drink it!  Again, use proper chick water.  It will help keep the water clean and keep the chicks from drowning! 

Grit ~ Chickens don’t have teeth.  Their gizzard grinds the food with the aid of small pebbles.  For chicks, provide them a small dish of play sand or parakeet gravel. 

The Brooder ~ Baby chicks need to be protected from drafts but still have adequate ventilation. This can be in the form of a cardboard box a large plastic storage bin or any kind of container that has sides high enough to keep them from jumping or flying out. 

A Heat Source  ~ The first week of their lives they require an air temperature of 95 degrees, the second week 90 degrees, and so on - going down by 5 degrees per week until they're ready to transition to "outside". A 250-watt infrared heat lamp is the best way to achieve this, is to put the heat lamp at one end of the brooder. The height of the light will depend on what it takes to achieve your target temperature.  When you see your chicks piled up they are trying to keep warm.  If they are spread out and panting they are too hot.  It is important that they are able to move in and out of the warmest part of the brooder. 

Bedding~  Absorbent bedding is a must.  Pine shavings are the best choice.  Do not use cedar!   Put just enough in the brooder to absorb their mess and to keep them from slipping.  Newspaper is not a good idea.  It does not provide enough traction.  If you prefer to use something other than pine shavings, grippy shelf liner will work.

Pasting Up ~ Nearly all chicks will get “pasting up”.  This happens when their poo gets stuck in their fluff.   It can be deadly.  If the poo blocks the vent,  the chick cannot pass anymore waste and can die very quickly  It is easy to clean with a warm wet paper towel and a little patience. 

Waterfowl ~ Without their mama, ducklings and goslings do not have the proper oil on their down to keep them dry and afloat.  If you let your babies swim, make sure they don’t get water logged and that they have a warm place to dry off.


Chicks don’t stay little for long.  Whatever long-term coop solution you go with, make sure it provides 2 square feet per bird.  It sounds like a lot, but as they get older (and bigger) you'll realize why this is necessary.  They should have access to the outdoors where they are protected from predators like cats, dogs, raccoons and hawks.  

 Prepared for Tractor Supply Company store 1668  by Brooke Hahn..   Brooke is a Member of Appleton 4H Club and Fuzz and Feathers Poultry Club  


Tuesday, January 1, 2013


Corn and Black Bean Salad
=========================
1 gallon size zip lock bag
2 Tablespoons Water
2 Cans Black Beans, Drained and rinsed
4 ears fresh corn or 1 pound package of frozen corn      
1 Red Bell Pepper, cut into small strips
3-5 green onions, sliced (about 1 cup)
2 Jalapeno Peppers, minced (or less)
1/3 cup vegetable oil
1/4 cup fresh lime juice
1 Teaspoon gound cumin
1/2 to 1 teaspoon hot pepper sauce
1/2 teaspoon grated lime peel
4 cups mixed salad greens
.
Cut corn from Cob.  Place fresh or frozen corn in bag.  Add remaining
ingredients.  Close bag completely.  Hold a corner of the bag in each
hand and toss ingredients together by gently shaking.  Refrigerate for 1 hour. 
Serve over the salad greens.

Salt if necessary.

Wednesday, December 19, 2012


Ingredients

  • 6 hardcooked eggs (peeled cut in half and yolks mashed in a bowl)
  • 14 cup mayonnaise
  • 1 tsp Tomato taste
  • 1 Tbsp prepared horseradish
  • 1 tsp Worcestershire sauce
  • 1 Tbsp chopped celery (including leaves)
  • 12 tsp Dijon mustard
  • 12 tsp celery seed
  • 12 tsp Tabasco sauce (taste)
  •  2 tsp vodka (optional)
  • salt
  • black pepper
  • Topping:
  • 4 Tbsp Tomato Paste
  • 1 Tbsp Vodka (optional)
  • Dash of Tabasco (or more if you like it spicy)
  • chopped celery or celery leaves (garnish)

 Instructions

  1. In a mixing bowl smash the yolks, mayonnaise, tomato paste, horseradish, Worcestershire  chopped celery, mustard, celery see and, hot sauce. Transfer to a small plastic bag.  Allow the mixture to sit for 30 minutes for the flavors to meld.  Cut a small corner off and pipe the filling into the egg whites. Keep in the refrigerator.
  2. For the topping: In a small saute pan combine the tomato paste,  vodka and hot sauce and season to taste with salt and pepper.  Cook over  medium  heat until bubbly.  The consistency should be that of catsup.  If it is to  thick, use water or vodka to thin.  If it is too thin, continue to cook until it reaches the correct consistency   
  3. Cool the sauce to room temperature.  Just before serving, spoon the tomato sauce on top garnish the eggs with celery,  and serve.  
  4. The image shows the eggs topped with beef jerky...that was not to my liking. 

Tuesday, December 18, 2012

Blue Buffalo


Blue Buffalo

Ingredients                                                             

  • 1/4 cup chicken (cooked, finely chopped)
  • 1 hot sauce Buffalo wing sauce, enough to cover chicken, plus 5 teaspoons  (Franks Red Hot is my favorite)
  • 6 eggs (hard-cooked, peeled, cut in half, and yolks mashed in a bowl)
  • 1/4 cup butter (softened)
  • 3 Tablespoons Crumbled Blue Cheese (plus more to garnish)  
  • 1 tsp celery (chopped, plus more for garnish)
  • 1 salt (to taste)
  • 1 black pepper (to taste)

Preparation

  1. Place the chicken in small bowl and pour in enough Buffalo wing sauce to cover,  let sit for at least 5 minutes.
  2. Combine the thoroughly mashed yolks with the butter. Stir in the Blue Cheese and celery. Lift the chicken from the wing sauce and drain slightly, then add to the yolk mixture, along with the remaining 5 teaspoons Buffalo wing sauce. Taste, then season with salt and pepper.
  3. Fill the whites evenly with the mixture, garnish each egg half with some chopped celery and blue cheese, and allow to sit at room temperature 15 to 20 minutes before serving to let the flavors develop.

Sunday, December 16, 2012

Jalapeno Devils


  • 6 hard-cooked eggs

  • 1/4 cup sour cream

  • 2 tablespoons cooked corn kernels (fresh, canned or frozen)

  • 2 teaspoons chili powder

  • 1/2 teaspoon cumin

  • 1/2 teaspoon garlic powder  OR 1/4 teaspoon fresh minced garlic

  • 1/2 teaspoon cayenne pepper, or to taste

  • 1 teaspoon fresh cilatro

  • 2 tablespoons finely *chopped peppers* (see notes below)

  • salt and black pepper, to taste

  • Shredded Jack cheese, for 
    garnish


Cut the eggs in half and mash the yolks in a bowl. Combine the thoroughly mashed yolks with the sour cream. Stir in the corn, chili powder, cumin, garlic powder, cayenne and chiles. Taste, then season with salt and pepper.  If you are using canned corn and chilis, make sure to drain them well and pat them dry.  

Fill the whites evenly with the mixture and garnish each egg half with shredded cheese and if you like a bit of fresh cilatro or a slice of fresh pepper
*Use your favorite peppers.  For the most mild flavor use a mild canned green chili.
For a fresher flavor use a fresh green chili, jalapeno or Serrano pepper*

Saturday, December 15, 2012


The Devil Meets Greek Goddess     
                                                                             
Ingredients
  • 6 hard-cooked eggs, peeled and cut horizontally    
  • 1/4 cup Mayonnaise
  • 2Tablespoons Extra Virgin Olive Oil
  • 1/3 cup crumbled feta
  • salt and pepper to taste
  • 1/4 teaspoon. finely chopped rosemary  ~or~ 1/2 teaspoon dried
  • 12 Greek olives, pitted and finely diced
  • parsley or rosemary to garnish (optional)

Directions
Pop out (remove) the egg yolks to a small bowl and mash with a fork. In the work bowl of your food processor, combine the mashed egg yolks, mayonnaise, olive oil, feta, salt and pepper and mix thoroughly. Fill the empty egg white shells, either with a spoon or with a piping bag. Top with diced olives and parsley (if using) on top to garnish.
Cover lightly with plastic wrap and refrigerate for up to one day before serving

Image from Google Search  Recipe adapted from Deviled Egg by Debbei Moose

Friday, December 14, 2012


Dirty Martini Deviled Eggs 

Ingredients

  • 6 hard-cooked eggs
  • 3 tablespoons mayonnaise
  • 1-1/2 teaspoons minced fresh parsley
  • 1-1/2 teaspoons vodka
  • 1/2 teaspoon Vermouth (optional) 
  • 1/2 teaspoon olive juice
  • 1/8 teaspoon cayenne pepper
  • 1/4 teaspoon kosher salt
  • 1/4 teaspoon coarsely ground pepper
  • 14 Stuffed Olives.  Use Pimento, Garlic, Jalapeno or Blue Cheese

Directions

  • Finely chop eight olives and set aside. Cut eggs in half lengthwise. Remove yolks. In a small bowl, mash yolks. Add the chopped olives half the olives, mayonnaise, parsley, vodka, olive juice and cayenne; mix well. Stuff or pipe into egg whites.
  • Cut the remaining olives in half. Garnish eggs with olive halves and sprinkle with salt and pepper. Refrigerate until serving. Yield: 1 dozen.
If you garnish like the picture with a whole olive you will need 22 olives and toothpicks. 

Variation ~  For Gibson Deviled Eggs substitute the olives for cocktail onions. Just make sure to chop the onions finely. ~

Recipe from Deviled Eggs  by Debbie Moose. 

Thursday, December 13, 2012

Spinach Bacon Deviled Eggs

12 Hard Cooked Eggs, Cooled,  Peeled, Cut in Half, Yoke Removed.

1/4 Cup Cooked Bacon, Crumbled
1/2 Cup Chopped Spinach
2 1/2 T Apple Cider Vinegar
2 Tbs Softened Butter
1tsp Sugar
2 Tsp Black Pepper
1/4 tsp Salt

Cook the bacon and reserve the drippings.  Finely chop the spinach and toss in the bacon grease until wilted. When the spinach and bacon have cooled, add the remaining ingredients mix well.  Add the egg yokes and mix.  Fill egg whites with the mixture.


The original recipe calls for frozen spinach and bacon bits.  Photo and Original recipe from "Deviled Eggs" By Debbie Moose


Wednesday, December 12, 2012

Super Quick Breadsticks or Pizza Dough 

In the time it takes to brown the hamburger, add the sauce an boil the pasta, you can have fresh hot yeast bread on your dinner table! 

1 Package (2 1/4 teaspoons) of Quick Dry Yeast  
1c. Lukewarm Water
2 Tbsp Olive or Vegetable Oil
1 Tbsp Honey
2 1/2 c. Flour
1 tsp salt
1/2 tsp garlic powder. 

Mix the yeast and the water. Add all the other ingredients and kneed until smooth.  Let rest for 10 minutes.  Form into pizza crust or bread sticks.  For thin crust pizza top right away and bake.  For thick crust press into pan and let rest for 5-10 minutes, top and bake. For breadsticks form into sticks, let rest for 10 minutes and bake for 12 minutes or until lightly golden. 

You can add herbs or make it into cheesy bread or both! 


Monday, December 10, 2012


Spiced Persimmon Pear Bread

·         3/4 cup chopped pecans, divided
·         1 1/4 cups all-purpose flour
·         1 cup whole-wheat flour
·         1/2 cup packed dark brown sugar
·         1 1/2 teaspoons baking soda
·         1 teaspoon salt
·         1 teaspoon ground cinnamon
·         1/2 teaspoon ground nutmeg
·         1/8 teaspoon ground cloves
·         1 cup plain fat-free yogurt
·         1/3 cup ripe pears, finely diced 
·         1/3 cup honey
·         1/4 cup canola oil
·         2 teaspoons grated peeled fresh ginger
·         1 teaspoon vanilla extract
·         2 large eggs, lightly beaten
·         1/2 cup diced peeled persimmon
·         Cooking spray
INSTRUCTIONS
1.    Preheat oven to 375°. Place 1/2 cup pecans in a single layer on a baking sheet. Bake at 375° for 8 minutes or until pecans are fragrant and toasted. Cool. Coat two bread baking tins with vegetable spray.
2.    In a large bowl, combine flours and next 6 ingredients (through cloves) , stir well. In another bowl, combine yogurt and next 6 ingredients (through eggs), mix well using a whisk. Fold in egg mixture to flour mixture. Fold in persimmon and toasted pecans. Spoon batter into tins. Sprinkle tops with remaining 1/4 cup pecans.
3.    Bake at 375° for 18 minutes or until a wooden pick inserted in center comes out clean. Cool in pans for 5 minutes on a wire rack, and remove from pans.

Sunday, December 2, 2012

Poultry Pedicure

It is time to talk toes.  I have been a little negligent about tending to my birds toenails.  My young birds do fine and rarely need any toenail attention.  However, Best Friend is nearly 9, Tiny is nearly 8 and just like humans, chicken nails need more attention as they get older. When you chickens nails are too long it can cause a host of troubles including leg and back pain, the nail can split and crack, leading to infection and the  the worst part is that they cant scratch properly, if at all.  Long nails can begin a vicious cycle. The nail gets long and starts to curl or turn and the bird cant scratch properly and so the nail gets longer. Pretty soon you have a mess on your hands! 

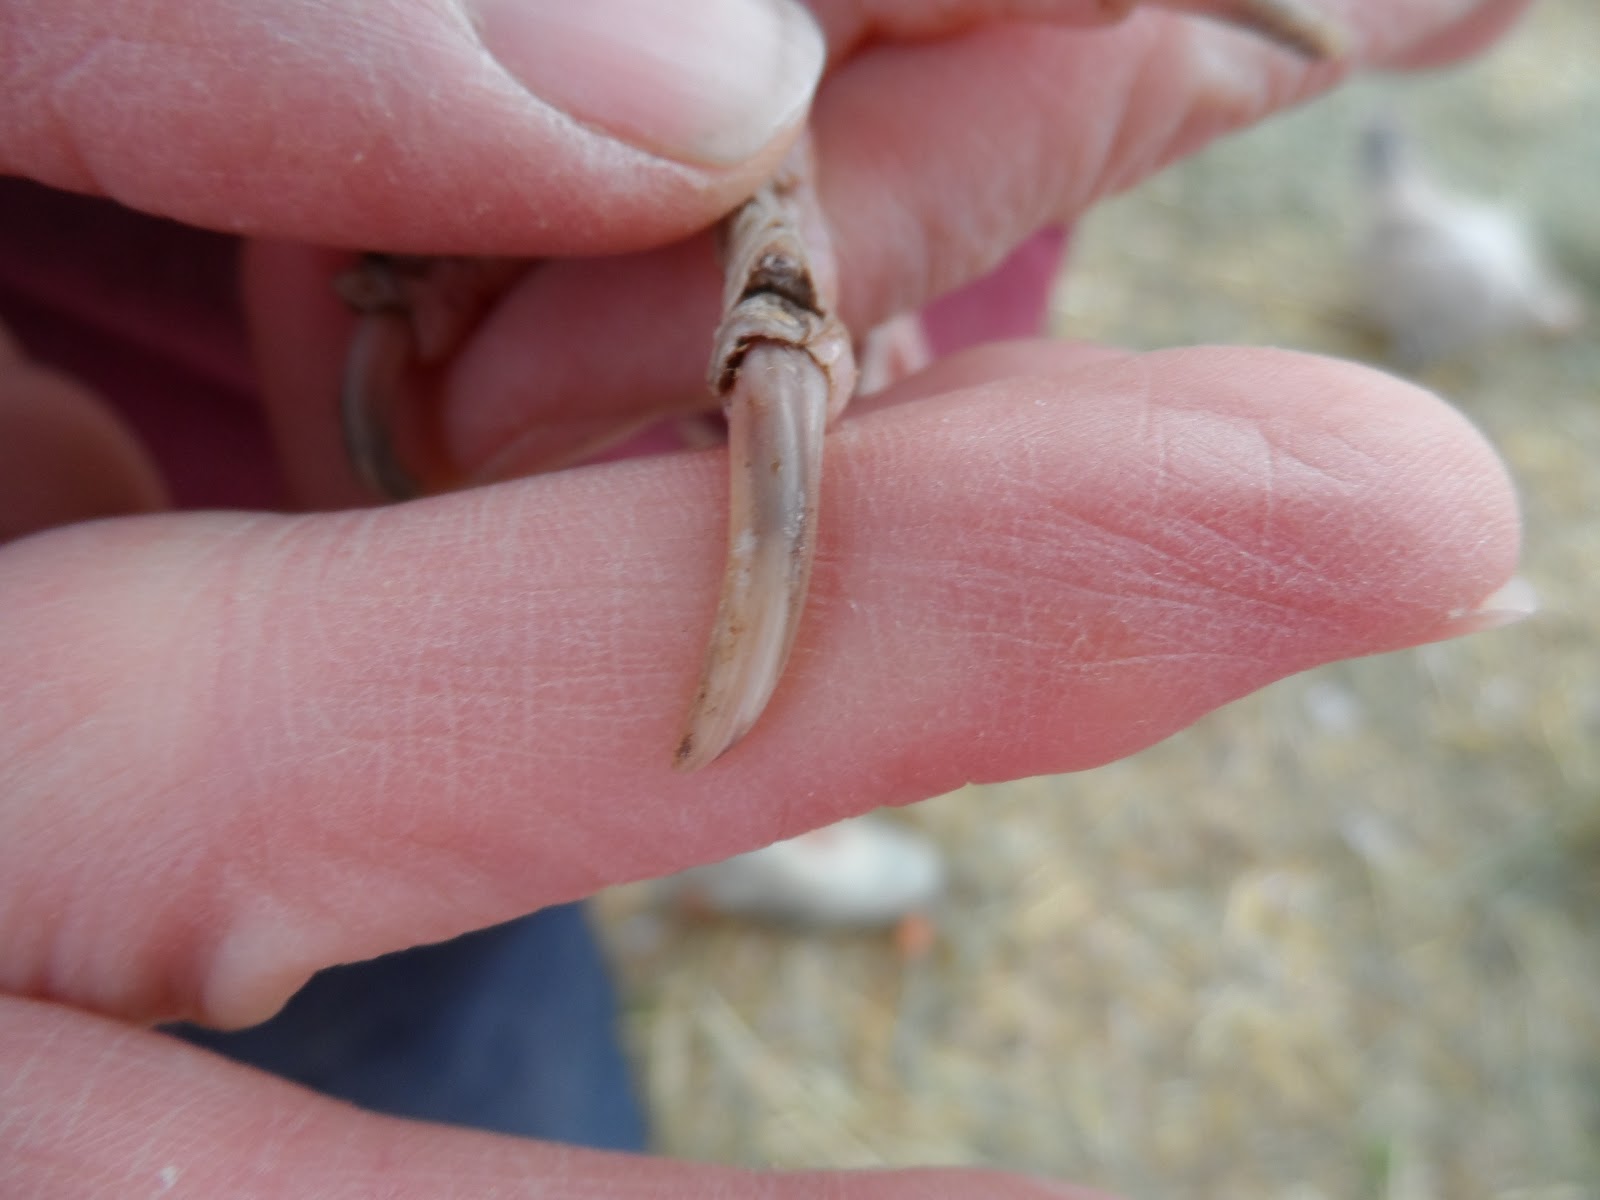
These photos are perfect examples of why you need to trim your birds nails.  This is a photo of one of Best Friends untrimmed toes.  You can see that the nail is much too long  and  it is jagged and cracking.  It is pretty easy to see the dead nail at the bottom and the darker kwik near the top.  If you look about half way down the nail you can see where the quick stops.  


This is Tiny's toenail.  While it is not in the same sorry state that Best Friends is, it is still much too long.  It is also easy to see the kwik inside the nail.

Trimming chicken nails is easy and you should not be afraid to do it.  It is just like clipping your own nails.  Don't hit the pink part and you will be fine!  

Supply List
1.   A pair of sharp clippers.  I have a pair of small animal clippers that I got from a pet shop for around $5.00  I keep them in my poultry first aid kit.  I find them easier to use than regular human nail clippers because the have the natural round shape of an animal nail.
2. A small dish of Corn Starch...just in case. 
3. Emery Board

You may want to have a helper until you get the hang of it.


 Have your assistant hold the bird like a football with her head under your arm and facing behind them, with the feet facing you. 

Once the bird is calm, look at each nail and decide which ones need trimmed.


If you look at the underside of the nail, it is pretty easy to see the kwik.  


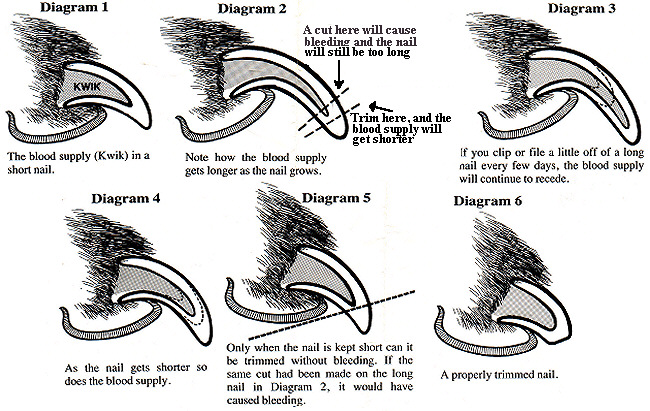
Start trimming slowly and trim just the dead nail.  As you are trimming you will see the center start to get lighter and pinker.  Trim just to the edge of the pink.  The great thing about animal nails is that as the dead nail is kept shorter the kwik will shrink.  It takes a few trimmings to get the nail to the right length, but regular trimming will allow you to keep your birds nails in tip top condition! 


Unfortunately I let Best Friend's and Tiny's nails get too long and will take a few more trimmings to get them back into shape.  If I trim them once per week, in a month they should be just the right length. 


I don't normally have a helper when I trim, but the principles are the same.  The big girls I hold like a football and the little ones I hold front facing.  


Once you have trimmed the nail you can shape it with the emery board if you like.  If you happen to cut a little too close and it bleeds, don't panic!  Just dip the toe into the cornstarch to help stop the bleeding.  If you are careful and take your time you will be fine!  Unless you jump in and just whack the nail off at the toe, it is not likely that your chicken will bleed very much.  If you are really nervous about trimming nails,  call a local pet  groomer and ask them if you could bring the bird in and have them teach you how to do it.  


Here is a great graphic about how to trim a nail and how the kiwk and the nail work together.  This is a dogs toe but it is applicable to poultry too!  


Poultry Pedicures are easy and so important for the health of your birds!